Create a GitHub Repository and Push the First Commit
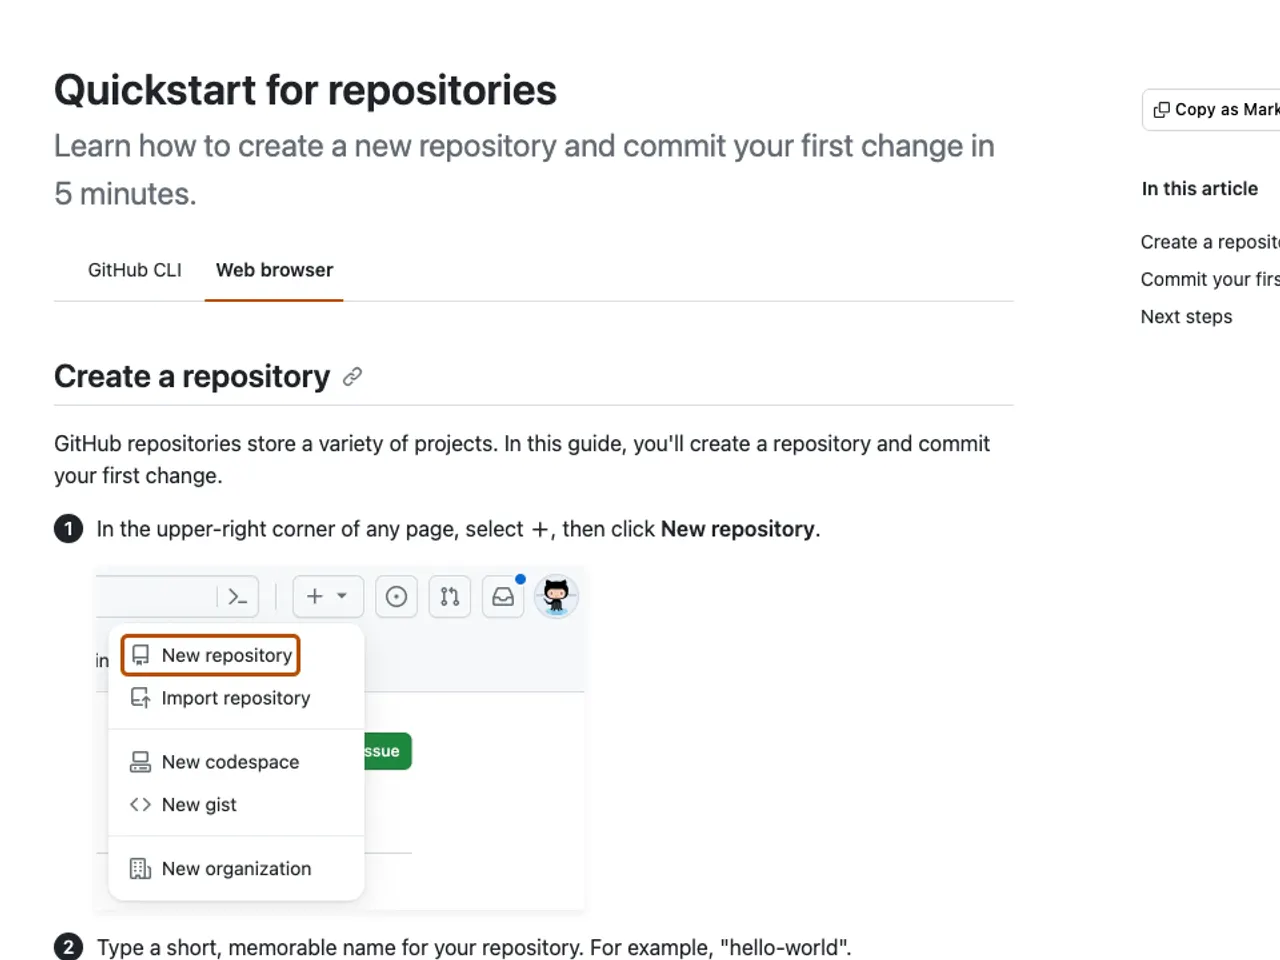
Select New repository from the plus icon in the top-right corner, set the name and visibility, enable README addition, and click Create repository.
 GitHub
- Category
- Developer tools & APIs
- Official sources
- 3
- Read time
- 8 min
- Last checked
- 2026.08.12
Two decisions to make before creating a repository
On the repository creation screen, the two choices that are difficult to change later are the name and visibility. The name becomes part of the URL, so changing it requires updating links and local remote settings.
Visibility is determined by exposure requirements, not cost. GitHub Free allows unlimited use of public repositories with full features, and private repositories can be created without quantity limits, though some features are restricted.
Choose private if the repository contains access credentials or actual data; choose public for portfolio purposes.
| Decision criterion | Public repository | Private repository |
|---|---|---|
| Access scope | All internet users | Only explicitly invited users |
| Free account features | Full features | Some features restricted |
| Collaborators | Unlimited | Unlimited |
| Suitable use cases | Portfolio, open source | Repositories containing credentials or real data |
Creating a repository on the web and connecting it to a local folder
The following steps outline creating a repository on the web and then connecting an existing local folder to it. Enabling README addition creates an initial commit on the repository, so if the local folder already has commits, merging the two histories is required.
- Click the plus icon in the top-right corner of the screen and select New repository.
- Enter a name in the Repository name field using lowercase letters and hyphens, and specify the visibility.
- Enable the Add README option to generate a description file on the repository’s first page, then click Create repository.
- In the local working folder, open a terminal and initialize the repository with git init, then stage files using git add.
- Create the first commit with git commit -m and include a commit message describing the changes.
- Copy the repository address displayed on the web page and connect it as the remote origin using git remote add origin.
- Push the commit to the remote repository using git push --set-upstream origin HEAD and verify the file list appears on the web page after refreshing.
Pre-push checklist: Verify the remote address belongs to the correct account, ensure no credential files are included in the folder being pushed, and confirm the default branch name matches between local and remote repositories.
File size limits are divided into three tiers
File size restrictions are enforced at three levels: warning, blocking, and browser upload. Files exceeding 50MiB trigger a warning but the push succeeds, while files over 100MiB are blocked. Direct browser uploads are capped at 25MiB.
Files blocked due to size limits should be moved to Git Large File Storage or, if binaries are for distribution, uploaded via the Releases feature. The recommended repository size is under 1GB, with a strong recommendation to stay under 5GB.
Including external libraries directly in the repository quickly exceeds these limits, so using package managers is preferred.
| Situation | Threshold | Result |
|---|---|---|
| Adding or modifying files | Over 50MiB | Warning displayed; push succeeds |
| Adding or modifying files | Over 100MiB | Blocked; Git LFS required |
| Browser upload | Over 25MiB | Upload fails |
| Entire repository | Under 1GB recommended, under 5GB strongly recommended | Exceeding 5GB may require contacting support |
Diagnosing push failures by error type
Push failures fall into three categories based on the error message displayed: authentication issues, remote history conflicts, or file size limits.
If the error indicates the remote is ahead, it means a commit generated by enabling README addition exists on the remote but not locally. Pull the remote history to merge it, then push again. Avoid force-pushing as it removes remote commits and cannot be recovered, especially in collaborative repositories.
Repeated authentication errors require checking the organization account’s permission policies. If the organization restricts authentication methods, access is denied regardless of personal settings, so request policy adjustments from the administrator. The same symptom occurs when attempting to access a company repository using a personal account.
Verifying the upload and proceeding to the next step
After a successful push, the uploaded file appears in the repository’s file list, and the commit count and latest commit message match the local entries. If files are missing despite the list being updated, check .gitignore rules as they may be excluding the files.
For environments where terminal use is difficult, tools like GitHub Desktop can perform the same operations via a graphical interface. For a small number of files, direct uploads via the web interface are possible, though the 25MiB browser upload limit still applies.
Sources
GitHub Docs — Create a repository (2026-08-16)
GitHub Docs — About large files on GitHub (2026-08-16)
GitHub Docs — About repositories (2026-08-16)
Open provider document